Wednesday, June 24, 2009

How to Compress Photos in PowerPoint 2007

Picture Tools
Reducing the file size in PowerPoint is always a good idea, particularly if your presentation is photo intense, such as in a digital photo album. Using many large photos in your presentation can cause your computer to become sluggish and possibly crash during your time in the spotlight. Photo compression can quickly reduce the file size of one or all of your photos at the same time. This is a great tool to use if you must email your presentation to colleagues or clients.

1. Click on a picture to activate the Picture Tools, located above the ribbon.
2. Click on the Format button if it is not already selected.
3. The Compress Pictures button is located on the left side of the ribbon.


Compress Pictures Dialog Box
1. Which Pictures Will Be Compressed?
Once you have clicked on the Compress Pictures button, the Compress Pictures dialog box opens.
By default PowerPoint 2007 assumes that you will want to compress all photos in the presentation. If you wish to compress only the selected photo, check the box for Apply to selected pictures only.

2. Compression Settings
• Click the Options... button.
• By default, all pictures in the presentation are compressed on save.
• By default, all cropped areas of any picture will be deleted. Remove this check mark if you do not want any cropped areas to be deleted. Only the cropped area will show on screen, but the pictures will be retained in their entirety.
• In the Target Output section there are three photo compression options. In most cases, choosing the last option, Email (96 dpi), is the best selection. Unless you plan to print out quality photos of your slides, this option will reduce the file size by the greatest margin. There will be little discernible difference in the screen output of a slide at 150 or 96 dpi.

3. Click OK twice, to apply the settings and close the Compress Pictures dialog box.

Note - In my sample presentation, I used a digital photo album containing nine photos. These are my results.
• before compressing photos, the file size was 15 MB
• after compressing the pictures, the file size was 2.91 MB

By Wendy Russell,
From http://presentationsoft.about.com

How to Recover a Corrupt PowerPoint File

Applies to Microsoft Office PowerPoint 2003 and Microsoft PowerPoint 2000 and 2002

This article is excerpted from "Recovering a corrupt PowerPoint file," by Echo Swinford. For the complete text of the article, see EchosVoice.
You’ve worked hard on your presentation, but when you try to open it, you receive an error message, “PowerPoint cannot open the type of file represented by filename.ppt.” This is the classic sign of a corrupt presentation, but don’t panic yet—you may be able to get at least some of the file back.

Is it a password-protected file?
Before you determine that your file is indeed corrupt, first find out if a password was added to it in PowerPoint 2002 (also known as PowerPoint XP) or PowerPoint 2003. If the file does have a password and you are trying to open it by using a previous version of PowerPoint, you will receive this error. Ask the person who created the file to resave it without the password, or use the PowerPoint 2003 Viewer to view the presentation.

Was the file sent to you as an e-mail attachment?
If you received the file as an e-mail attachment, it may have become corrupted as it traveled through cyberspace. Ask the sender to zip the file by using Microsoft Windows® XP’s built-in zip function or a program such as WinZip, and then resend. Or have them upload the file to a File Transfer Protocol (FTP) site, if you have one available.

Are you using PowerPoint 2003 to open a presentation created in a previous version of PowerPoint?

If you are using PowerPoint 2003 and have problems opening files created in previous versions of PowerPoint, click Check for Updates on the Help menu, and then install the Critical Update for PowerPoint 2003. If you want to know why you need this Critical Update, see this Office 2003 Critical Update overview

Nope, the file is really corrupt
If your file is truly corrupt, there are a number of things you can try to recover it.
1. Use Slides from Files on the Insert menu.
2. Locate a TMP file.
3. Open the presentation in Microsoft Office Word.
4. Move the file to a different place.
5. Open the file in a different way.
6. Use Safe Mode.
7. Use Damaged Presentations Troubleshooters.
8. Try a third-party recovery tool.

Use Slides from Files on the Insert menu
Sometimes you can recover some or all of a corrupt presentation by clicking Slides from Files on the Insert menu. Use the following steps:
1. Open a new blank presentation.
2. On the Insert menu, click Slides from Files.
3. In the Slide Finder dialog box, browse to your corrupt file.
4. Click Insert All.

If clicking Insert All doesn’t work, try clicking Insert to insert individual slides.
Note: If your corrupt slides do insert, they will take on the blank presentation formatting. You can apply the original design template to correct this. You can experiment by selecting the Keep source formatting check box in the Slide Finder dialog box if you want. The real goal, though, is to get your information back. You can reformat it if necessary.

Locate a TMP file
Occasionally when you lose your file, there will be a TMP file available. This usually only happens when you lose the file while saving, or if you were working on it when PowerPoint or Windows crashed. Nevertheless, it’s worth checking.

1. Right-click the Windows Start button, and then click Search.
2. In the All or part of the file name box, type *.TMP.
3. In the Look in list, click either Local Hard Drives, or even My Computer.
4. Click Search.
5. After Windows finds your TMP files, click the Date Modified button at the top of the Search Results pane. You might have to scroll to the right to see this button.
6. Look for a TMP file created around the time that you lost your PowerPoint file. Note the folder it’s in.
7. Open PowerPoint, and then click Open on the File menu.
8. Click the arrow next to the Files of Type box at the bottom of that dialog box, and then click All Files.
9. Navigate to the folder where the TMP file is located.
10. Click the TMP file, and then click Open

Open the presentation in Word
You may be able to recover at least part of your text this way.
1. Open Word.
2. On the File menu, click Open.
3. In the Open dialog box, click the arrow next to the Files of Type box at the bottom of that dialog box, and then click Recover Text From Any File.
4. Navigate to your corrupt file, select it, and then click Open.

Don’t forget to reset your Files of Type option in the Open dialog box back to All Word Documents after you finish, or you may see strange things happen when you subsequently open Word documents. If you are able to recover your text in Word, you can move the text back into PowerPoint by clicking File, pointing to Send To, and then clicking Microsoft Office PowerPoint.

Spend some time with the styles in Word so that the text ends up where you want it in PowerPoint. All text formatted Heading 1 will become slide Title text in PowerPoint. Heading 2 style will become primary bulleted text. Heading 3 will become secondary bulleted text.

Move the file to a different place
If you’re trying to open the file from removable media (a floppy disk, a Zip or Jaz drive, a USB drive, a CD-ROM, a network server, or a shared drive), try copying the presentation to your hard drive, and then try to open it.
Try copying the file to a different computer’s hard drive, and then try to open it there.
Try copying the file to a different drive on your computer (for instance, if it’s on the C drive, copy it to the G drive), and then open it from there.

Open the file in a different way
There are a few things to try here. I personally haven’t had much luck recovering a truly corrupt file by opening it in a different manner, but it doesn’t hurt to try.
1. Click Open on the File menu in PowerPoint.
2. Double-click the PowerPoint file in Windows Explorer.
3. Drag the corrupt file to the PowerPoint program file (POWERPNT.exe).
4. Open the file by using one of the PowerPoint Viewers. (Of course, this won’t help much if you need to do more than view the presentation. You should be able to at least print it from the Viewer, though.)

Use Safe Mode
Try opening PowerPoint in Safe Mode and see if that enables you to open the file.
1. In Windows, click Start, click Run, and then type C:\Program Files\Microsoft Office\Office10\Powerpnt.exe" /safe in the Open box.
2. Insert the appropriate path for your version of PowerPoint.

Try opening Windows in Safe Mode.
1. Click Start, click either Turn Off Computer or Shut Down, and then choose Restart.
2. When your computer restarts, press and hold down the appropriate “F” function key to restart in Safe Mode. F8 is often the key to use.
3. Open PowerPoint, and then try to open your presentation.

These techniques are the least likely to work, but they’re worth trying. Usually if a presentation opens when in PowerPoint or Windows Safe Mode, it’s because of a conflict with a driver or an add-in. You may also want to run a ScanDisk and use the Error-checking options on its Tools menu.

Try a third-party recovery tool
Because other products do not include all of PowerPoint’s functionality, or might not support elements of that functionality in their import utilities, you can sometimes use them to open files that PowerPoint identifies as corrupt.

Although you probably won't recover everything in your presentation, if you don’t have any luck using any of the previous methods, you might want to consider a third-party recovery tool.

For a detailed discussion of third-party recovery tools, see the full text of this article on EchosVoice.

Conclusion
Recovering a corrupt PowerPoint file is iffy at best. If you have a backup of your file, dig it out and get back to work. But before you do that, check the information on how to prevent corruption in the first place so that you don’t just end up with another corrupt file.

By Echo Swinford, Microsoft MVP and creator of EchosVoice.

Tuesday, June 16, 2009

How to Advance Slides Automatically in PowerPoint

Are you lazy like me and feel that clicking your mouse to change slides in PowerPoint 2007 is not a good use of your time? Maybe not!

But maybe you just want a series of slides to advance automatically while you talk to your PowerPoint deck. Well with PowerPoint 2007 it is easy.

1) Select the slides you want to have automatically advance
2) In the Ribbon, make sure you are on the “Animations” tab
3) Look to the far right hand side, and make sure you check “Automatically After”
4) Beside that checkbox, enter the number of seconds you want to the slide wait before it automatically transitions to the next.


Simple as that! While you are there, you can also change the transition – whether you want a fade, dissolve, wipe, push and cover, or stripes and bars – just choose your favorite from the transition gallery!

How to Insert a SWF file to PowerPoint 2007

Have you or a creative genius close to you created an unreal shockwave/flash animation and you want to show the world?

Did you know that you can show off that animation using PowerPoint 2007? Bet you didn’t. That being said it isn’t the simplest of things you can do – but it does work. Here is the step by step guide to doing it!
1) Open PowerPoint 2007
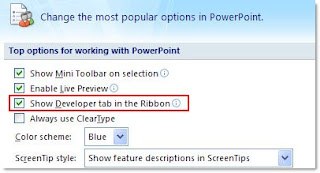
2) Make sure you can see the “Developer” tab in the “Ribbon”. If you can’t, click on the Office menu (the circle button in the top left hand corner), then click on “PowerPoint Options”, and make sure that you check the “Show Developer tab in the Ribbon” box!


3) Go to the slide you want the .swf file to appear
4) Click on the “Developer” tab in the Ribbon
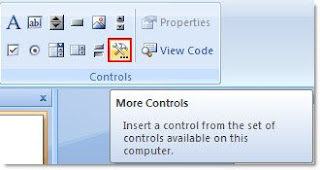
5) Look for the “More Controls” button in the controls group. It is the one with a spanner and a hammer with three dots underneath it. Once you find it – click on it


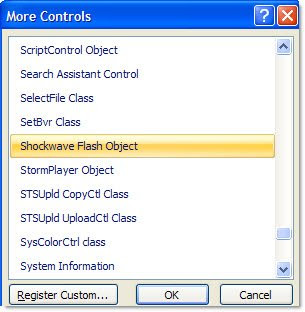
6) The “More Controls” box will appear. Scroll down until you find “Shockwave Flash Object”. Click on that, then click “OK”


7) You will notice your cursor is now a cross, and no longer an arrow. That means you can now draw where you want your Shockwave/Flash file to appear on your slide. Simply draw with your mouse, and use the adjustment handles on the box to make sure it is just the right size and position on your slide. When you are done you should see a wireframe box with a big “X” through the middle of it.
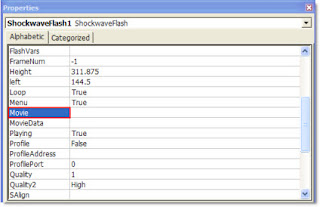
8)Now we want to link your .swf file into your PowerPoint 2007 presentation. Click on the box you just drew, then right click, and select “Properties”
9) In the properties box that appears, look for the “Movie” property, and then add the location of your .swf file (for example c:\temp\test.swf)


10) Quickly run your presentation and watch in awe as your shockwave file hits the big screen in your PowerPoint 2007 presentation

So how did you go? Sure it is a little complicated to get there, but boy does it look good once you have that file playing through PowerPoint.

Just a word of warning though – this only LINKS to the .swf file, so if you email or share the presentation with others, chances are the link will break and you will need to go through the above process again to re-link the PowerPoint deck to the .swf

Thursday, June 11, 2009

How to Set Background Picture for a PowerPoint File

For designing an attractive PowerPoint, you may want to set background picture for your slideshow. Here is the way.

For PowerPoint 2003:
1. Open/Create a PowerPoint file
2. Choose one slide, Right Click on it, and then click Background

3. Click on Pull-Down Menu, choose the Fill Effects

4. Choose the Picture tab at the top of the Fill Effects dialog box. Click on the Select Picture button to locate the photo saved on your computer.

5. Click OK to add the picture to the slide background.
6. Click Apply to All or Apply button

For PowerPoint 2007:
1. Click on the slide that you want to add a background to.
2. On the Design tab, in the Background group, click Background Styles, and then click Format Background.


3. Click Fill, and then click Picture or Texture fill.

4. Do one of the following
1) To insert a picture from a file, click File, and then locate and double-click the picture that you want to insert
2) To paste a picture that you copied, click Clipboard.
3) To use clip art as a background picture, click Clip Art, and then in the Search text box, type a word or phrase that describes the clip that you want, or type all or part of the file name of the clip. To include clip art that is available on Microsoft Office Online in your search, select the Include content from office Online check box, click Go, and then click the clip to insert it.

5. To use the picture as a background for the slides that you select, click Close. To use the picture as a background for all of the slides in your presentation, click Apply to All.

How to Play a Sound across Multiple Slides in PowerPoint

Want the sound inserted into your PowerPoint play across multiple slides? Here is the way.

For PowerPoint 2003
1. Go to the slide where you want to begin your audio track (defaulted as the first slide), and select Insert -> Movies and Sounds -> Sound from File to insert the sound.

2. After you click OK, you can see a message pop up asking how you want the sound to start in slide shows. Click Automatically.

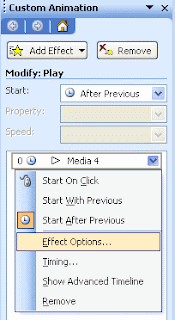
3. Select Slide Show -> Custom Animation to enter the Custom Animation pane. Your soundtrack is listed below in the pane.

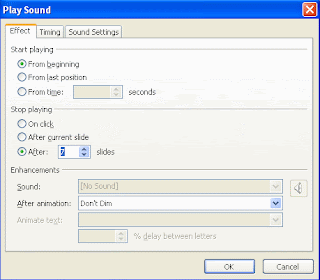
4. In the drop-down list of the sound, choose Effect Options. Then the Play Sound interface appears. In the Effect tab, click the radio button beside Stop Playing After XXX slides (which indicates how many slides you want this song to play across) to enter the number of slides you intend to add. For example, you can enter a number from 1 to 999 for this field. Then the sound will play throughout the specified slides.


5. Next, check the settings in the Timing tab. To play automatically, you can set to Start After Previous with a 0-second delay. Click OK to exit the dialog box.
6. Then go to Sound Settings tab, adjust the sound volume as you like. You can also tick to hide sound icon during slideshow if you don’t want it appear.

For PowerPoint 2007:
It is much easier to make a continuous sound in PowerPoint 2007, as it is more comprehensive. Just follow these steps:
1. On the slide, click Insert to pick the Sound drop-down list on the very right below the tab. Select Sound from File in the list and choose the specified sound track from your hard drive.

2. Click OK and a message prompts, hint How do you want the sound to start in the slide show. Click Automatically.

3. Now click the sound icon to display the Options tab. Click on the tab, and set Play across slides for Play Sound.


With the steps above, it is time for you to enjoy the pleasant sound.