Wednesday, April 22, 2009

6 tips to reduce the size of your PowerPoint file

Is a PowerPoint file that is over 10 MG too large? Yes! PowerPoint files shouldn’t be too large to send in an email or load into a Google Group.
The following 6 tips will help you reduce the size of your PowerPoint.
1. File > Save As
2. Compress Pictures
3. Break Links
4. Turn off Fast Saves
5. Turn off the Activated Review Feature
6. Sneaky trick … use save as a CD to compress

1. How to Use File > Save As:
Step 1 - On the File menu, click Save As
Step 2 - Type a new name, and click OK
** In some cases, this can reduce the size of the file by up to 50%

2. How to Compress Pictures in PowerPoint:
If you have any pictures in your PowerPoint presentation, then you can optimize the size by compressing pictures.
Step 1 - Click on the picture to bring up the Picture toolbar
Step 2- Click the compress picture button


Step 3 - On the Compress Pictures menu:
• Apply to: All pictures in document
• Change resolution: Web/Screen
• Options: Compress pictures and Delete cropped areas of pictures
• Click OK

When the command finishes, you can save the file at a fraction of it’s prior size. In this case we had 100+ maps in a 70 Meg file. After the Compress Picture command finished, the file was only 12 Meg.

3. How to Break Links in PowerPoint:
For our operational finance decks, we link to Excel. Before emailing your final PowerPoint file, I suggest breaking all links. More links = bigger file size.
Step 1: Type [ALT+ E], then [ALT+K] to view the Links menu or on the Edit menu, click Links
Step 2: Select all links. Click on the first link, hold the shift key and click on the last link. All Links will be highlighted in blue.


Step 3: Select Break Link, and all links will be removed from the PowerPoint

4. Turn off Fast Saves
Step 1: On the Tools menu, click Options, click the Save tab, and then clear the Allow fast saves check box. (This removes excess data from your presentation file each time you save)
Step 2: On the File menu, click Save As, type a name for the new version of your presentation in the File namebox, and then click OK.

5. How to turn off the Activated Review Feature in PowerPoint:
This only works on PowerPoint 2007
Step 1: On the Tools menu, click Options, click the Advanced E-mail tab
Step 2: Clear the check box next to “add properties to attachments to enable reply with changes”

6. How to use save as a CD to compress your PowerPoint file:
When all else fails, this trick always has a big impact on reducing the size of a PowerPoint file.
Step 1: On the Files menu, click Package for CD

Step 2: Select a folder where the new file will be saved


From http://businesstoolsblog.com

Sunday, April 19, 2009

How to Group Objects in PowerPoint

Blocks, arrows, pictures and other objects inside a page of a PowerPoint slide are hard to maintain if not grouped. It is hard to move each object especially if their relative position needs to be maintained.
For example, you have two blocks and an arrow on a PowerPoint page, selecting the 3 objects will highlight them individually:


Ungrouped objects are easy to break during editing. If I failed to select all 3 objects, the selected objects might get separated. In the example below I selected only the second box so when I moved it it got separated from the other objects:


If my intention was to move the whole thing, grouping the objects together is the right approach. Compare the two flow charts below where in we have the ungrouped objects on the left while the grouped objects on the right:


You can see that the grouped object is highlighted as a single object while the ungrouped objects are individually selected. Grouped objects are taken as one so moving a group does not separate the individual objects inside it.
To group a set of objects, choose the objects and then right click to open the Group menu. Click Grouping then Group:


Once objects are grouped, they will move as one. You will still be able to edit the test inside a grouped text box:


To un-group, just right click the group then click Group > Ungroup:


Grouping objects is an essential PowerPoint skill especially if you handle a lot of flowcharts or drawn objects.

From http://www.online-tech-tips.com

Thursday, April 16, 2009

Instant PowerPoint Presentations Using The PhotoAlbum Feature

PowerPoint presentations are a great way of communicating and influencing your clients, work colleagues or audience. One of the most important components within presentations are images. This article will show you how to take a group of images and turn them, as if by magic, into a PowerPoint presentation.

You can use the techniques described in this article whenever you have a group of images whose content are at the core of the presentation you need to create. One example might be giving a presentation to introduce a new range of products based around a series of product photos.

To get started you need to bring up the New Presentation task pane. To do this, choose File - New. Next, click on “Photo Album” in the New Presentation task pane window.

When the Photo Album window appears, you begin identifying the images you want included in the presentation. You can click on the button marked File/Disk to browse for the images or you can import them straight from your digital camera or scanner.

The Photo Album window is very versatile. Once, you have imported your pictures, it allows you to reorder them by selecting and image and clicking on the up and down arrows. If you change your mind and decide to delete an image, no problem. Just click on the name of the image then click the Remove button.

Next, you can check the tonal quality of each image. You can increase or decrease the brightness or contrast as necessary by just clicking on one of the four image control icons. In addition, you can rotate images clockwise or anti-clockwise by clicking on one of the two image transformation icons.

However important a part your images will play in the presentation, every presentation will need some text. The Picture Layout drop-down menu lets you specify whether you want one, two or four images with a title. (You can omit the title, though it is unlikely you will wan to do so.) You can also place the title above or below the image.

There is also an option to change what is referred to as the Frame Shape. The default is rectangle. However, the Frame Shape drop-down menu will also let you choose rounded rectangle, bevelled, oval, corner tabs, square tabs or plaque tabs.

That’s it; you’ve finished. When you click OK, PowerPoint will create the presentation generating a separate slide for each image, using the settings that you specified in the Photo Album dialogue. The final touch is to go to each slide and type some text into the title box. Once you’ve done that, you have yourself a PowerPoint presentation. How painless is that!

From http://www.theworldofoffice.com
by Andrew Whiteman

Related article:
How to Create a Digital Photo Album with PowerPoint


Tuesday, April 14, 2009

How To Embed Mp3 Audio Files In Microsoft PowerPoint Presentation

If you use Microsoft Office PowerPoint to make presentations you will know that you can only embed wav audio files. The problem is that wav format is almost 10 times bigger in size when compared with mp3 format. The only working technique is that we can add a header to the mp3 file that will convince the PowerPoint that it is actually a wav audio file. This method will add the wav extension at the end of the file name but the format will remain as mp3, this is known as masking.

In my earlier post I reviewed a software called CDex, you can use it to add wav header to the mp3 file. First convert wav audio to mp3 format by clicking Convert Wav file(s) to mp3 format(s) button or selecting it from the Convert menu as shown in the screenshot below.


Now select the directory where the wav file resides, select the file from the list and click Convert.


The converted mp3 file will be located in your My Music folder inside the Documents folder(you can however change the output destination by going to Options).
If you already have an mp3 file then you can skip the above steps. Just select Add RIFF-WAV(s) header to MP2 or MP3 file(s) from the Convert menu and in the new window select the mp3 file to which you want to add the header.


In my case, test.mp3 was given a wav header and it became test.wav, the size of both files were same. The test.wav is just a file to confuse PowerPoint, actually it is in mp3 format with .wav extension at the end of the file name.
Now open Microsoft Office PowerPoint, go to Insert tab, click Add Sound From File, and select the audio file.


Now once the sound has been added, you will be automatically taken to Sound Tools tab. Here under Sound Options, increase the maximum size of audio file that can be embedded to 50000KB.


Since the changes made in the options are not retroactive, you will have to delete the audio file and re-add it again. Now when you re-add it, the audio file will be embedded inside the presentation instead of simply getting linked.

Embedded audio and Linked audio are different in every aspect, embedded audio is stored inside the presentation while linked audio is stored outside the presentation. Embedded audio can come useful in cases where you have to email a presentation to someone. To verify whether your audio file has indeed been embedded in the presentation, click the Dialog Box Launcher under Sound Options.


Now under Information, next to File, you will see [Contained in presentation], this means the audio file has been successfully embedded.


Note: This technique has been tested multiple times and is 100% confirmed to be working, if it doesn’t work for you, this means that you did not follow the steps properly.
Enjoy!

From http://www.addictivetips.com/
By Nakodari

Thursday, April 9, 2009

Insert a movie (or video) into PowerPoint 2003 and run it full screen

Insert a movie and play it automatically
In PowerPoint 2003, you can run your movies full screen. This is a very nice feature.
1. On the Insert menu, point to Movies and Sounds, and then click Movie from File.

2. Click the video you want to use and then click OK.
TIP: Always put the movie in the same folder as your PowerPoint presentation. If you later move the PowerPoint presentation to another computer, copy the movie too. Keeping your movie in the same folder as your presentation ensures the link will still work. However, you should always test the movie on a new machine just to be certain. Re-insert the movie, if necessary.)

3. After you click OK, you're prompted with a message asking how you want the movie to start in the slide show.

I recommend choosing Automatically even if you want the movie to play when clicked – I'll talk about how to set this part too. (If you choose When Clicked you have to click the black box to start the movie. Because I don’t like to show the black box on the slide, I do this a little differently.)

4. You should now have a small rectangle sitting on your slide.

Insert a movie using a file on your computer or in another location, such as a server.
The movie appears as a still frame on your slide.
The trick I use is to move that rectangle off the slide, so it is sitting next to it, but not on it. You can size it down if you like. Click the movie (that is, the rectangle) and then drag it off the slide.


Play the movie full screen
5. Right-click the movie object (the small rectangle) and on the shortcut menu, click Edit Movie Object.

6. The Movie Options dialog box appears. Under Display Options, select the Zoom to full screen check box, and then click OK.


7. If you want your movie to play automatically when you advance to this slide, you can stop here.
Test this now to see how it works by starting the slide show. (On the Slide Show menu, click View Show.) Advance to the slide with the movie, (best if you have the title of the movie on it). Within a couple of seconds, the movie starts to play full screen. When the movie finishes, you return to the same slide (but no unsightly box appears). Click to advance to your next slide.

From http://office.microsoft.com
By Mary Feil-Jacobs

Wednesday, April 8, 2009

Save Sounds That are Embedded in PowerPoint Slide Shows

If I receive a PowerPoint presentation that is already in the slide show format, how can I retrieve the music or sound files since they are embedded in the presentation?

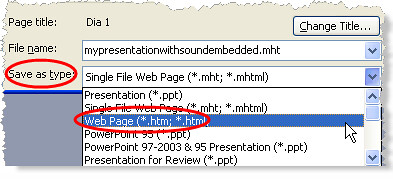
Music or other sound objects that are embedded in a PowerPoint slide show can be extracted by converting the show file to an HTML document. This is the format used for Web pages. All the individual parts of the presentation will be extracted separately by PowerPoint and placed in a new folder. Here is how it is done.

Save PowerPoint slide show in HTML format to extract embedded sounds in PowerPoint

From http://presentationsoft.about.com
By Wendy Russell