Tuesday, May 19, 2009

Movies or Video Clips in PowerPoint

Insert the Movie into PowerPoint

Insert the Movie or Video Clip
• PowerPoint 2007
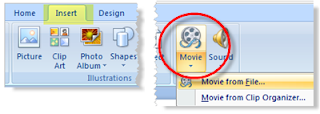
1. Click in the Insert tab of the ribbon.
2. Click the drop down arrow on the Movie button on the right side of the ribbon.
3. Choose to insert a Movie from File... or Movie from Clip Organizer...
• PowerPoint 2003
1. Choose Insert > Movies and Sounds > Movie from File... or Movie from Clip Organizer

Note - Movies from the Clip Organizer are not really movies per se, but are actually animated GIFs

Choose a Movie File Type for Use in PowerPoint
Not All Movie File Types are Equal
Movie file types, which are indicated by the file extension, are many. Not all movie file types are compatible with PowerPoint. The most commonly used compatible movie file types for PowerPoint are -
• WMV
• AVI
• MPG
• ASF

A further consideration is the file size of the movie file to be inserted into your presentation. A large movie file size may not even play on your computer. Generally, an AVI file is much larger than the MPG or WMV file types. You may need to consider using other software to first compress your movie file into a smaller size before inserting it into PowerPoint. However, be aware, that with video compression comes some loss of quality.

Choose Your Movie File Type
1. At the bottom of the Insert Movie dialog box, click the drop down arrow beside Files of type:
2. Choose the correct file type from the list.
3. Locate the movie file on your computer.
4. Click OK.

Choose a Method to Start the Movie in PowerPoint
Start Movie Automatically or On Click
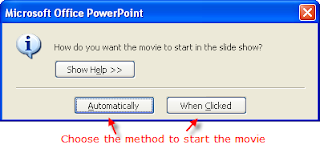
You will be prompted for the method to start this movie during the slide show.
• Automatically - The movie will start immediately following the previous motion. A motion can be a transition, an animation or simply the showing of the previous slide.
• When Clicked - The movie will not start until the mouse is clicked. The movie will follow the previous motion.

Test the Movie
1. Press Shift + F5, a shortcut key combination that will show this slide in full screen.
2. Press the Esc key to stop the slide show.

From http://presentationsoft.about.com
By Wendy Russell

Further reading:

PowerPoint to movie - Top 3 Methods about PowerPoint to Movie Conversion
PowerPoint to FLV - How to convert PowerPoint to FLV

Wednesday, May 13, 2009

How to Hyperlink to another Presentation - Hyperlinks in PowerPoint

Question: How Do I Use a Hyperlink to Open Another Presentation Seamlessly?

The scenario
Two presenters are on the agenda. They both have PowerPoint presentations to accompany them. The first presenter finishes and then the second presenter fumbles around trying to find his presentation on the computer before he can start. The audience starts to fidget and talk among themselves and the momentum is lost.
How can you keep the flow going from one presenter to the next, without losing the audience's attention?


Answer: The simplest answer is to create a slide at the end of the first presentation that contains an invisible hyperlink to open the second presentation. When the second presenter steps up front and center, all he has do is click the mouse and his PowerPoint presentation will open.

A tiny bit of preparation is necessary before the big moment. A single slide needs to be added to the end of the first presentation. Generally, I like this to be a black slide, but rather than use PowerPoint's feature to add a black slide at the end of the presentation, you will add a new slide and cover it entirely with a black rectangle. This graphic object will be the source of the hyperlink to the second presentation.

Secondly, it is always in your best interest to have all the files for any presentation located in the same folder. So, create a new folder and copy all presentations and any linked components into that folder before you continue.

PowerPoint 2007
1. Add a new slide to the end of the first presentation.
2. From the Home tab of the ribbon click on the rectangle tool in the Drawing section of the ribbon.
3. Draw a rectangle large enough to cover the whole slide.
4. Right click on the rectangle and choose Format Shape...
5. In the Format Shape dialog box, select Fill > Solid Fill. Choose black from the Color drop down selections and then close the Format Shape dialog box.
6. Right click on the rectangle again and choose Hyperlink....
7. In the Link to: section on the left side of the dialog box, choose Existing File or Web Page.
8. Locate the second PowerPoint presentation file previously saved on this computer.
9. Click OK

Now when you run the first slide show, the new presenter simply clicks on the last slide (the black slide) when he is ready to go, and his presentation will open in slide show view, on the first slide.

PowerPoint 2003 and earlier
1. Add a new slide to the end of the first presentation.
2. Using the Drawing toolbar at the bottom of the PowerPoint window, click on the rectangle tool.
3. Draw a rectangle large enough to cover the whole slide.
4. Right click on the rectangle and choose Format AutoShape... and change the fill color to black.
5. Right click on the rectangle again and choose Hyperlink....
6. In the Link to: section on the left side of the dialog box, choose Existing File or Web Page.
7. Locate the second PowerPoint presentation file previously saved on this computer.
8. Click OK

Now when you run the first slide show, the new presenter simply clicks on the last slide (the black slide) when he is ready to go, and his presentation will open in slide show view, on the first slide.

From http://presentationsoft.about.com
By Wendy Russell

Monday, May 11, 2009

How Do I Rehearse and Record Timings in PowerPoint?

Question: How Do I Rehearse and Record Timings in PowerPoint?
Many readers wonder how to know what timings to set for their slides. The easiest way to set the slide timings is to rehearse and time your PowerPoint presentation by progressing through the slides as if you were seeing them for the first time. As you click the mouse to advance the slides, PowerPoint can record the timings on the slides for you.


Answer: When setting automatic timings for your presentation, it is often difficult to decide how long your slides should stay on screen.

Things to consider:
Is this a photo album where each slide will stay on screen for the same length of time?
Is your presentation meant to accompany your talk on the subject, where each slide will be on screen for a different length of time?
Are there time constraints on your presentation?
All these things need to be considered when setting timings for your presentation.
The easiest way to know exactly how long your presentation will take is to Rehearse Timings. This feature is found in the Slide Show menu.

Method
1. Make sure the first slide in the presentation is selected.
2. Choose Slide Show > Rehearse Timings from the menu. The Rehearsal toolbar will appear and the timer will start.
3. Each time you click the mouse (or the Next button on the Rehearsal toolbar) the next item will begin.
4. Once you have completed the rehearsal, PowerPoint will prompt you to save these timings.
• Choosing Yes will assign the timings for each slide. Every slide may have a different timing assigned, depending on how long you left the slide on screen, during the rehearsal.
• Choosing No will cancel these timings and allow you to go through the process again until you are happy with the results.

For Example
• Start the Rehearsal timings. Once you have decided that the Title slide has appeared long enough on screen, click the mouse.
• The transition to the next slide will start and the next item will appear -- probably the title of the next slide.
• Click the mouse again and the next item will appear -- perhaps a graphic or bullet point. Whatever animations you have applied to the slide will start on the mouse click.

Note - It is a good idea to rehearse your oral presentation out loud while you rehearse the timings. This way you will know exactly when to pause for effect and when to advance to the next slide. You can pause the rehearsal at any time, to gather your thoughts, by clicking on the Pause button on the Rehearsal toolbar. You can also assign a timing manually to a specific slide, by typing the time into the text box on the Rehearsal toolbar.

From http://presentationsoft.about.com
By Wendy Russell

Tuesday, May 5, 2009

How to Play YouTube Videos Directly in a PowerPoint

Many times see people ask how to insert YouTube videos in PowerPoint. Many good solutions are found, such as the method mentioned in this article: http://www.ppt-to-video.com/knowledges/embed-youtube-powerpoint.html#105
But how can you directly play a YouTube video in PowerPoint? Here is the way.

1. Open Microsoft PowerPoint 2007

2. Go to Developer (to enable this, go to Office button-> PowerPoint options-> Show Developer tab in the Ribbon), and then click More Controls


3. Scroll down until you find “Shockwave Flash Object”; select it. Then on your slide, click and drag to make a box. The box should have a black X in the middle.


4. Open up your favorite internet browser and go to the video you want to put in your presentation.

5. Copy the URL which will look something like: http://www.youtube.com/watch?v=fGPjB4qzUy8

6. Take the “watch?v=FGPjB4qzUy8″ and simply change it to “watch/v/FGPjB4qzUy8″. (All I did was change the ? and = to a /. The final URL should look like: http://www.youtube.com/watch/v/FGPjB4qzUy8

7. Copy the new URL and go back to your PowerPoint. Right click on the box you made earlier and select properties.

8. Then find “movie” and click on the box across from that. Paste the new URL into that spot. Click the X to close that window.

10. Finally, play your Powerpoint and the Youtube video will appear like magic!

Further reading:
PowerPoint to movie - Top 3 Methods about PowerPoint to Movie Conversion
PowerPoint on Windows Media Player - View PowerPoint on Windows Media Player

Monday, May 4, 2009

Lock PowerPoint File From Being Edited

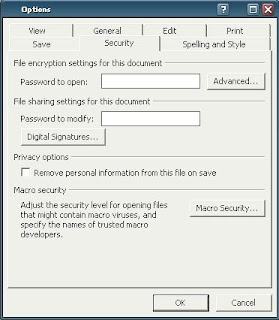
You might have to distribute copies of your PowerPoint presentations to other people. It is important that you lock or protect that PowerPoint file so others can view it, but not make changes to it. There are numerous software that will promise to add password protection to your file but you will have to pay money for those software. As a matter of fact, Microsoft PowerPoint already has a built-in feature that will allow you to lock the Power Point file.

1. Open up your PowerPoint Presentation
2. Go to Tools
3. Options
4. Security
5. Enter a password for “Password to modify.”


You can also type in a password to restrict viewing of the PowerPoint file. Just type a password in “Password to open” and click OK.
That’s how it works in Microsoft PowerPoint 2003, and I assume it’s similar in older versions of Power Point.

Another method is saving and distributing the presentation as a Powerpoint Show (.PPS) instead of PowerPoint Presentation (.PPT). The presentation cannot be edited anymore when in (.PPS). To do this:

1. Click File
2. Save As…
3. Select (.PPS) under “Save as type.”

Have you considered converting the (.PPT) PowerPoint file format to an Acrobat PDF format? But you’d be better off just password protecting the file, that way they could still watch the slide show. But if you want make a PDF, carry on. Granted, not everyone has the full version of Adobe Acrobat Pro (which costs well $). But there are freeware tools, such as Pdf995. Pdf995 can convert various files to PDF. PDFs are much harder to modify than a Microsoft-password-protected PPT file.

From http://roobaroo.net