Monday, January 19, 2009

How to Burn PowerPoint to DVD with DVD Menus

Burning PowerPoint to DVD is a good solution of preserving PowerPoint presentations and preventing them from being edited by others. Also, by burning PowerPoint to DVD is ideal for viewing PowerPoint presentations through various media. But have you ever thought that you can create DVD menus for your presentations to be viewed on TV with a DVD remote control just like a movie?

With eye-catching DVD menus, one can easily catch audience’s attention and set quick navigation for the PowerPoint presentations. Here below is a ready-made DVD menu for some PowerPoint presentations.


Also want to make one for your own presentations? So follow the step-by-step guide of how to burn PowerPoint to DVD with Acoolsoft PPT2DVD and create stunning DVD menus.
1. Install Acoolsoft PPT2DVD on your computer and open it. You can get it free from here.

2. Click Import button to choose the presentations you want to convert.

3. Click DVD Menu button on the top navigation, and then you will come to the DVD menu page. Click DVD Menu Creator button, then you will be able to start to customize the DVD menu for your presentations.

Here you can set the background, button style, frame style, icon style, caption and more to the current selected menu. In the preview area, it shows the preview for the current menu, and changes will be shown in real-time when you design it. Tool pane is used to set properties of current menu.

4. Tool Pane:


In the Background tab, you can choose a background for your menu from the gallery that the program itself offers, or choose one from your own computer. There are several different types of background for you to choose, including business/exhibition type, education/training type, holiday/celebration type, nature/environment type, religious/spiritual type and others.
You can also set background music for the current selected menu by clicking Background Music button.
In the Button Style tab, you can set the button style, frame style and the icon style for each of your menu. There are many different options for you. You can choose a proper one according to your own interest.
Apply to All is used to apply your settings to all your menus.


In the Caption tab, you can edit the caption of a selected object just as in word.
In Advanced tab, you can tick Disable this menu button to disable current menu, and you will need to select an action that will be taken at the end of show. In Menu Options, it lists the options on current menu. You can remove corresponding object by removing the tick of the item.

5. Want to see how the DVD menu you’ve created will work in real time? So follow this step. On the top right of the DVD Menu page, you can see a DVD remote control simulator.

This is a soft-remote-control integrated in menu simulator. You can find those buttons on normal DVD remote controls. The simulator includes four cross direction selection buttons, which allow you to select items on the menu, and the center one is the confirm button. The Menu and Title button are for switching to different menus when playing presentation.

6. Choose output options, video settings and advanced settings for your presentation and burn your PowerPoint presentations to DVD without attendance.

It’s all that easy to finish the whole process of designing specific DVD menu for your PowerPoint presentations. Start now, burn PowerPoint to DVD and enjoy the happy time it brings to you. Click here to learn more about how to burn PowerPoint to DVD.

How to insert Flash Video to PowerPoint and convert PowerPoint to FLV

What is FLV video format?
FLV is the short term for Flash Video, a kind of video format that is accepted by many websites. Notable users of the flash video format include YouTube, Google video, Reuters.com, Yahoo video and My Space.

How to insert FLV into PowerPoint?
Now and then, you may find attractive videos in FLV format on the above websites such as YouTube. Want to embed them in your PowerPoint and share with others?

As FLV is a video format that PowerPoint doesn’t accept, before embedding a FLV video into PowerPoint, you should convert FLV movie to a video format that PowerPoint accepts such as MPEG, AVI, WMV and ASF. Below are three ways for you to do this:
1. If the FLV video is on YouTube or MySpace, follow these steps:
Copy the YouTube or MySpace video URL >>
Go to http://vixy.net (a free online conversion service), paste the URL in the conversion box >>
Select the output format such as AVI, MOV and MP4. Then click Start. The conversion process would be done automatically >>
When the conversion is done, download the output video to the local disk on your computer >>
Insert the video to PowerPoint ( PowerPoint -> Insert -> Movies and sounds -> Movie from File)


2. If the FLV video is already on your computer, visit http://www.media-convert.com/ (a free online conversion service) and follow these steps:
Browse your local disk and select the FLV video needs to be converted >>


Select the output format you want, and click OK button on the right >>
When the conversion process is over, download the converted video to your computer >>
Insert the video to PowerPoint ( PowerPoint -> Insert -> Movies and sounds -> Movie from File)

3. Use some conversion software to do this: If you have lots of FLV videos need to be converted, you can use some professional conversion tool to help you save your time, because many tools support batch conversion. You can try this one Video Converter. It can help you convert your FLV (YouTube) video to almost all other video formats.

After inserting Flash Video from popular video sites to your PowerPoint, have you ever thought you can also upload your PowerPoint to these popular video sites for wide sharing? You can click here to know more benefits of uploading PowerPoint to online-sharing websites.

As it has been mentioned above, YouTube, Google video, Reuters.com, Yahoo video and My Space all accept video formats in FLV. Before uploading your PowerPoint to these sites, you need to convert your PowerPoint to FLV first. Here are some tools you can use to convert your PowerPoint to FLV.

Acoolsoft PPT2Video Converter, Wondershare PPT to Video: help convert your PowerPoint to almost all popular video formats such as FLV, MPEG, AVI, MP4, WMV, 3GP, FLV and MOV.
After converting your PowerPoint to FLV, the next step is to upload the converted video to these websites. It’s all that easy. For more details about how to do it step by step, you can click here.

Choose the method you like to insert flash video to your PowerPoint, and convert your PowerPoint to FLV. Have more fun about it.

Create Digital Photo Albums with PowerPoint 2007

You may have precious photographs or important business pictures from time to time. A PowerPoint photo album is just a presentation that helps you store and display these photos in a digital way.

Why we want to make photo album with PowerPoint?
1. PowerPoint is available on most computers. You don’t need to buy other software to make a photo album. It is easy and cost-effective to do it with PowerPoint.
2. Show your photos according to the sequence you like, make your memories more beautiful.
3. Besides photos, you can also add effects such as attention-grabbing slide transitions, colorful backgrounds, specific picture layouts and more into your PowerPoint photo album.
4. A photo album that is made in PowerPoint is easy for wide sharing.

Below is the step of how to create an attractive digital photo album with PowerPoint 2007 in 6 steps:
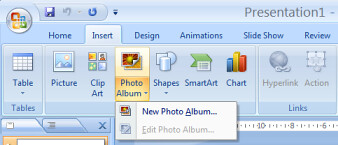
1. Open PowerPoint, on the Insert tab, click the Photo Album button, in the drop-down list, there is the New Photo Album option.


2. Insert pictures
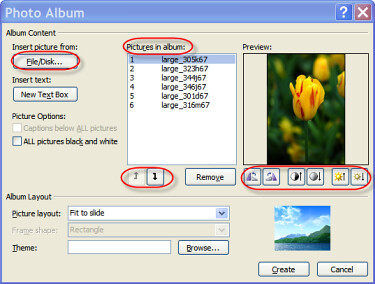
Click File/Disc button. Choose pictures you want to include in the album from folders on your hard disc. (Tip: you can import several pictures to the album at a time)
In the photo album dialogue box, you will see the selected pictures in the Picture in Album list. You can view each picture by clicking it. And you can also change the order of a picture by choosing it and clicking the Move Up or Move Down button. Below the preview of the picture, you will be able to see six buttons, which you can use to adjust the rotation, contrast and brightness of each picture.


3. Create album layout
Under Album Layout, by clicking Picture layout arrow, and then in the drop-down list, you can choose the layout format you like. By clicking Frame Shape arrow, in the drop-down list of it you can choose the frame you want to add to your pictures.

4. Create title and subtitle for your album
After you have clicked Create button, on Slide 1, type the title you want for your album in the place of the words of Photo Album. Then if necessary, give your album a subtitle by inputting it in the place of your user name.
Display Slide 2, click the title placeholder, and then type the title for this slide.

5. Edit the photo album
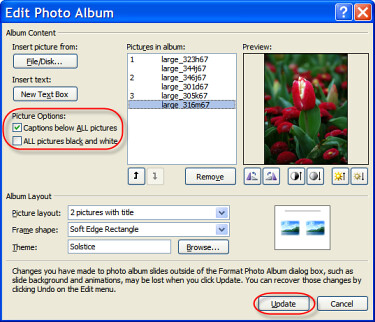
On the Insert tab, click the Photo Album arrow, and then click Edit Photo Album.
In the Edit Photo Album dialog box, under Picture Options, select Captions below All pictures box, and then click Update.

Now you can edit the file name below each picture with a suitable caption.

6. Apply a theme to your album
On the Design tab of PowerPoint, in the Themes area, select a theme that meets the need of your album.
Or you can also customize the look of your album by choosing a theme from your computer.

Now you have finished making your own PowerPoint photo album. Want to e-mail it to your friends or colleague? Want to share it with others? Or you want to keep it for permanent store? Below are a few tips about how to do this.
1. E-mail your photo album to others
Maybe you will find that the photo album is in a huge size due to the mountainous images added in it, and you can’t send it properly via e-mail. In order to reduce the size of it, you can use compressed pictures in your photo album.
How: Open bitmap image with a program that converts images and save the image in one of the following graphic file formats: jpg, gif, tif, wmf. Once your image has been saved under another format, you can reinsert it into your photo album.
Here is an article tells how to reduce the file size of a PowerPoint

2. Share your photo album with others
You can upload your beautiful photo album to some online sharing websites, such as YouTube. Let more people enjoy it or let your friends view your photo album online.
How: Convert your Photo album to a certain format that YouTube accepts. Then upload it with your YouTube account.
Tool: Acoolsoft PPT2Video Converter
It helps you easily convert your photo album to WMV, AVI, MOV, and MPEG formats that can be accepted by YouTube. After the conversion, you can directly upload it.
Click here to get the tutorial about how to do it

3. Keep your photo album for permanent store
The photo album you make maybe valuable and meaningful. In order to store it and prevent it from being edited by others, so far the best way I know maybe is to record it on a DVD disc. As we know things stored in a digital way could be easily lost.
How: Use some professional tool to help you burn your photo album to DVD such as the PowerPoint to DVD tool from Acoolsoft.
Click here to get the tutorial about how to do it

To view the finished PowerPoint photo album is an enjoyable thing. The process of making it is also interesting. So, when are you going to create your next photo album? Very soon, I presume.

PowerPoint show to DVD slide show--- PPS to DVD

Most PowerPoint users know that PowerPoint presentations are usually saved in PPT format. Some of you may have received presentations that can be played directly when you click to open. Those files are in PPS format, namely PowerPoint show. A PPS is just a PPT file with a different file extension that tells PowerPoint opened directly into the slide show view pattern, not the editing view pattern. You can change it by renaming the file extension.

Despite the advantages we can see of a PPS file, there are also many disadvantages of a PPS file:
1. You'll either need MS PowerPoint or the PowerPoint viewer to view these files. So it may be inconvenient for viewing a PPS file.
2. System language could also be a problem, that is, if the language of one presentation is in Japanese, Spanish or some other ones, when viewing it under the English Windows, all the content would become a mess.
3. A PowerPoint show made in PowerPoint2007cannot be viewed under PowerPoint 97-2003, unless you save it as a PowerPoint 97-2003 presentation, but some great features will lose.

Regarding the deficits of PPS mentioned above, you can convert the PowerPoint to flash, turn PowerPoint to PDF, or burn PowerPoint to DVD/video. PDF is ideal for static slide shows, only images and text will be retained. Converting PowerPoint to flash is great for presentations that contain external hyperlinks, linked files, like Word or Excel files. But, so far, no PowerPoint to flash tool can retain all animations in PowerPoint. As to me, I prefer to burn PowerPoint show to DVD movies or convert to video. Below are some main benefits of burning a PPS to DVD:
1. Easy for delivery. After converting PPS to DVD, you do not need to worry the loss of sounds and videos contained in your presentation.
2. By converting PPS to DVD, you can view the PowerPoint presentation with a DVD player or DVD machine. It is great for long time preservation.
3. After converting PPS to DVD, you can give your presentations to your audience without worrying about it being modified without permission.
4. By converting the PPS file to video formats, the file size would be much smaller, and you can also mail it to others conveniently.

Usually there are two ways for us. The free way is to use Windows Movie Maker. But, there is no free lunch in the world. By using Windows Movie Maker, all the animations in the original presentation will be lost after the conversion. Below are the steps of how to do it.
Step1. Save your PowerPoint slide show as "PNG" images.
Step2. Import the pictures to your Windows Movie Maker
Step3. Select all the imported images and add them to Storyboard
Step4. Add video effects to the slides (Optional)
Step5. Save the slide show as Movie File.

In order to get a higher quality, another way to do this is to use some specific PowerPoint to DVD software to help us do this directly. Search “PowerPoint to DVD” in Google, and you will get many advises. Recently, I have experienced 2 PowerPoint burning software.
1. Acoolsoft PPT2DVD


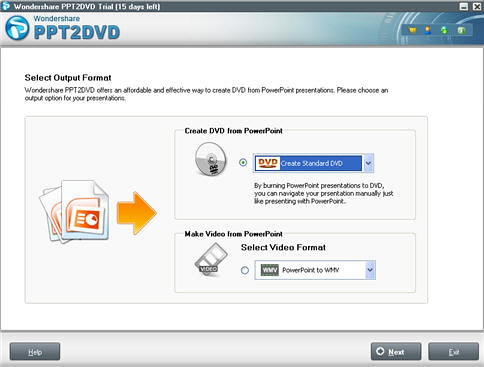
2. Wondershare PPT2DVD


They both are companies that have been dedicating in developing PowerPoint to DVD software. Acoolsoft PPT2DVD is more innovative, while Wondershare PPT2DVD is more sophisticated.
Common characters of these two tools:
• Work smoothly with Microsoft Office 2000/2002/2003/2007 and Vista
• Retain animations, transitions, sound tracks, movie clips and the inner hyperlinks from the original presentation
• Able to create professional look DVD menus
• Burn to DVD/HD-DVD with built-in DVD/CD burning program
• Support batch conversion

Differences:
The user interface of Acoolsoft PPT2DVD is more intuitive, users can even see the thumbnails of the inputted presentations; Wondershare PPT2DVD’s user interface is designed more focused on step-by step conversion.

Click here to learn more about how to burn PowerPoint to DVD/CD