Thursday, August 20, 2009

Top 5 Free Tools for YouTube Video

YouTube - a video sharing website on which users can upload and share videos. For better enjoy yourself from it, here I would like to list some top free tools to help you.
1. Free YouTube Downloader for Win – download videos you like from YouTube to your local drive for Win
2. Free Video Downloader for Mac – download FLV video from YouTube, Google, Break, MySpace and other YouTube-like video sharing sites for Mac
3. Free PPT2YouTube – convert PowerPoint to YouTube videos, enables you easily to upload PowerPoint to YouTube for sharing
4. Free YouTube video Converter – convert YouTube video to a certain video format that can be played on your iPod, PSP, iPhone, mobile phone, etc.
5. Free Video to FLV Converter – Convert any kind of video format to FLV for better quality after being uploaded to YouTube

Free YouTube Downloader for Win
Wondershare Free YouTube Downloader is totally a free program for users to download YouTube video clips to enjoy them off the Internet. It can automatically detect the YouTube video and other similar streaming FLV video when you are surfing on web pages. It has the following features:
1. Totally free YouTube downloader
2. Support downloading and playing all high quality videos on YouTube
3. A built-in FLV player
4. Support batch download multiple video clips at a time


Free Video Downloader for Mac
iSkysoft free video downloader for Mac is a free video downloader for downloading FLV video from YouTube, Google, Break, Metacafe, MySpace and other YouTube-like video sharing sites for Mac. It automatically detects the Internet videos and allows users to download full-length movies played in Safari and Firefox browsers on Mac OS instantly.

Free Acoolsoft PPT2YouTube
For many reasons, you may want to upload your PowerPoint to YouTube, such as the following:
1. Broadcast yourself on YouTube with promotional PowerPoint
2. Advertise your product or service with PowerPoint online
3. Share your unique or funny presentations
4. Share your PowerPoint slide show or photo album with friends or families on YouTube

But PowerPoint is not in a video format that YouTube accepts, so you need some tools to convert the PowerPoint to a certain video format first.
Free Acoolsoft PPT2YouTube is a just such a free tool which helps you easily convert fantastic PowerPoint to YouTube video for free. All you need to do is to import your PowerPoint files and click Start, after that, this PPT2YouTube tool will automatically convert PowerPoint to MP4 for free with animations, transitions, sounds and video clips retained. And then you can effortlessly upload it to YouTube for wide sharing.


Free YouTube Video Converter
CatchYouTube enables users to convert YouTube videos into any number of different video and audio formats and then to download them to computer. Here is how it works:
1. Cut and paste the YouTube URL into the CatchYouTube.com web site.
2. Follow the easy instructions to save the video to your computer
3. The conversion process is performed directly online, you don’t need to download any software


Free Video to FLV Converter
Not all video formats are accepted by YouTube, and in order to get a higher quality after you upload your video to YouTube, it is recommended to convert your video to FLV. This Free Video to Flash Converter helps users convert video to flash (SWF or FLV) to publish video on site. For example, convert AVI to FLV, MP4 to FLV, MPEG to FLV, WMV to FLV, MOV to FLV, and 3GP to FLV. It’s free for both personal and commercial use.


There are also many other free services for YouTube. If you are interested in it, you can find them in my following articles.

How to Add a Video from Online Video Site to PowerPoint 2010

PowerPoint 2010 Technical preview was released with lots of new features. It helps us make PowerPoint presentations more dynamic with improved audio and visual capabilities. One of the new features of PowerPoint 2010 is that you can add a video from any online video sharing sites like YouTube into your PowerPoint directly. You no longer need to download videos onto your computer first, and then insert them to your PowerPoint.

How to insert video from online video site to PowerPoint 2010:
To embed a video from online site like YouTube, click on the Insert tab in PowerPoint 2010. And then choose Video. Finally, select Video from Online Video Site.


After that, you will be able to see a dialogue box pops up which requires you to copy the embed code from the site and paste it into it.


Go to the video you want to insert to your PowerPoint 2010. Here I take one of my YouTube video for example. You should be able to see an Embed option under the author’s profile. Copy it and paste it into the box above. Finally click Insert.


One important thing to note is that: if you embed video from online video site in PowerPoint 2010, you will need to connect to the Internet to play them while showing the presentation.

Monday, August 3, 2009

Hot New Features of PowerPoint 2010 Preview

Microsoft plans to release its Office 2010 software suite in both 32-bit and 64-bit flavors, making it the first Office suite to support both versions. As its name suggests, both versions will be available sometime next year. So, what surprise PowerPoint 2010 will bring to us?

To summarize, PowerPoint 2010 can help us make presentations more dynamic with improved audio and visual capabilities. In addition to this, we can effectively use web applications to make our work available anywhere, and work with other people on the same presentation much easier. Now let’s have a quick look on it clearly.

1. New Animation Tools in PowerPoint 2010
New Animation tools, including an animation painter to copy animation from one object to another and also more animation designs.


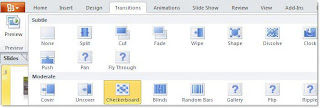
2. New 3D transitions make livening up a presentation easier in PowerPoint 2010


3. Directly insert videos from your file in PowerPoint 2010
You can now directly insert a video from your file to your presentation. Just click Insert, and then Video. Finally click Video from file…


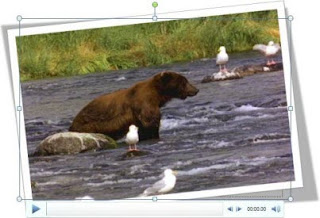
Also, editing video is much easier in PowerPoint 2010. You can trim video clips within PowerPoint and add effects such as reflection or color washes.


Here is an example:
This picture shows the way that the video displays before editing


This picture shows the way that the video displays after editing


4. Directly insert videos from online video sites such as YouTube, MySpace in PowerPoint 2010
Here are the steps of how to do it in PowerPoint 2010
1) Click Insert, and then select Video from Online Video Site…
2) Copy and paste the embed HTML into the box that pops up
3) Click Insert button, and then the video will be added to the presentation. Make sure your computer is connected with the Internet when show the presentation

5. Create Video from PowerPoint 2010
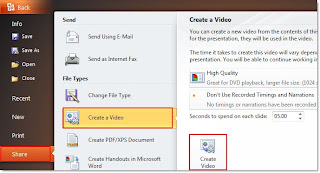
You can convert your PowerPoint 2010 to WMV video files directly in your presentation. Click Back button, and then Share. Finally click Create a Video.
After you convert your PowerPoint 2010 to video files, you can share it online with others. Also, you can load the video to your smart phones for reviewing.


With these new features, I believe PowerPoint 2010 will become a perfect tool for presenting our ideas, especially with the features of inserting video and creating video. So, let’s expect the release of it.

However, if you are eager to convert your PowerPoint to stunning video files now, you can try this tool: Acoolsoft PPT2Video Converter. It supports converting PowerPoint 2000/2002/2003/2007 to AVI, WMV, MPEG, MP4, MOV, FLV and 3GP. Except video output choice, you can also burn your PowerPoint to DVD with this PPT2DVD tool.

Wednesday, July 15, 2009

Password Protection in PowerPoint 2007

Password protection is applied differently in PowerPoint 2007 than in earlier versions, but it is just as easy. It is simply a matter of knowing where to look.
1. Click the Office button in the top left corner of the screen
2. Choose Save As.
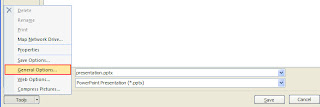
3. In the bottom left corner of the Save As dialog box, click on the Tools button.
4. Choose General Options


There are two password options available for you to add to your presentation.
1. Password to Open
This is a security feature that will encrypt your presentation and allow you to control who has access to the file.
 
2. Password to Modify
Sometimes you can allow others to see the presentation, but do not want any alterations made. By adding a password to this box, no one can make any changes to the presentation, without first entering the password.
You can choose to apply either of these password protection options, or both to your presentation. However, be aware that if you forget these passwords, even you will be unable to get back into the presentation.

Tuesday, July 7, 2009

Convert PowerPoint to YouTube Video for Free - Free Acoolsoft PPT2YouTube

For many reasons, you may want to upload your PowerPoint to YouTube. Such as the following situation:
1. Broadcast yourself on YouTube with a promotional PowerPoint presentation
2. Advertise your product or company with PowerPoint on YouTube
3. Share your unique or funny presentation on YouTube with millions of people
4. Upload PowerPoint to YouTube as an alternative solution to share PPT with friends and families who are not in the same place with you
5. Enable your PowerPoint to be viewed without the need of Microsoft PowerPoint

But How to Upload PowerPoint to YouTube
PowerPoint is not in a video format that YouTube accepts. The mainly video formats that YouTube accepts are MPEG, MOV, AVI, FLV and MP4. So, for uploading PowerPoint to YouTube, you will need to convert your PowerPoint to one of the video format first.

Free Acoolsoft PPT2YouTube is just a tool which can help users directly convert PowerPoint to a YouTube video for free. The output MP4 video file will retain all visual elements and animation effects in the original PPT.


After you convert your PowerPoint to MP4 video with Free Acoolsoft PPT2YouTube, the next step is to upload the video to YouTube. Here are the steps:
1. Click "Upload Videos “in the upper-right-hand corner of any YouTube page.
2. Enter as much information about your video as possible, including Title, Description, Tags, and Category. The more information you include, the easier it is for users to find your video!
3. Determine if you want your video set to Public or Private.
4. Click the "Continue Uploading “button.
5. In the next window, click the "Browse “button to browse for the video file. Select the file you want to upload.
6. Click the "Upload Video" button.

If you have any PowerPoint presentations that want to upload to YouTube, just try this Free PPT2YouTube tool. Convert your PowerPoint to a YouTube video for free and enjoy yourself with this fun.

Wednesday, June 24, 2009

How to Compress Photos in PowerPoint 2007

Picture Tools
Reducing the file size in PowerPoint is always a good idea, particularly if your presentation is photo intense, such as in a digital photo album. Using many large photos in your presentation can cause your computer to become sluggish and possibly crash during your time in the spotlight. Photo compression can quickly reduce the file size of one or all of your photos at the same time. This is a great tool to use if you must email your presentation to colleagues or clients.

1. Click on a picture to activate the Picture Tools, located above the ribbon.
2. Click on the Format button if it is not already selected.
3. The Compress Pictures button is located on the left side of the ribbon.


Compress Pictures Dialog Box
1. Which Pictures Will Be Compressed?
Once you have clicked on the Compress Pictures button, the Compress Pictures dialog box opens.
By default PowerPoint 2007 assumes that you will want to compress all photos in the presentation. If you wish to compress only the selected photo, check the box for Apply to selected pictures only.

2. Compression Settings
• Click the Options... button.
• By default, all pictures in the presentation are compressed on save.
• By default, all cropped areas of any picture will be deleted. Remove this check mark if you do not want any cropped areas to be deleted. Only the cropped area will show on screen, but the pictures will be retained in their entirety.
• In the Target Output section there are three photo compression options. In most cases, choosing the last option, Email (96 dpi), is the best selection. Unless you plan to print out quality photos of your slides, this option will reduce the file size by the greatest margin. There will be little discernible difference in the screen output of a slide at 150 or 96 dpi.

3. Click OK twice, to apply the settings and close the Compress Pictures dialog box.

Note - In my sample presentation, I used a digital photo album containing nine photos. These are my results.
• before compressing photos, the file size was 15 MB
• after compressing the pictures, the file size was 2.91 MB

By Wendy Russell,
From http://presentationsoft.about.com

How to Recover a Corrupt PowerPoint File

Applies to Microsoft Office PowerPoint 2003 and Microsoft PowerPoint 2000 and 2002

This article is excerpted from "Recovering a corrupt PowerPoint file," by Echo Swinford. For the complete text of the article, see EchosVoice.
You’ve worked hard on your presentation, but when you try to open it, you receive an error message, “PowerPoint cannot open the type of file represented by filename.ppt.” This is the classic sign of a corrupt presentation, but don’t panic yet—you may be able to get at least some of the file back.

Is it a password-protected file?
Before you determine that your file is indeed corrupt, first find out if a password was added to it in PowerPoint 2002 (also known as PowerPoint XP) or PowerPoint 2003. If the file does have a password and you are trying to open it by using a previous version of PowerPoint, you will receive this error. Ask the person who created the file to resave it without the password, or use the PowerPoint 2003 Viewer to view the presentation.

Was the file sent to you as an e-mail attachment?
If you received the file as an e-mail attachment, it may have become corrupted as it traveled through cyberspace. Ask the sender to zip the file by using Microsoft Windows® XP’s built-in zip function or a program such as WinZip, and then resend. Or have them upload the file to a File Transfer Protocol (FTP) site, if you have one available.

Are you using PowerPoint 2003 to open a presentation created in a previous version of PowerPoint?

If you are using PowerPoint 2003 and have problems opening files created in previous versions of PowerPoint, click Check for Updates on the Help menu, and then install the Critical Update for PowerPoint 2003. If you want to know why you need this Critical Update, see this Office 2003 Critical Update overview

Nope, the file is really corrupt
If your file is truly corrupt, there are a number of things you can try to recover it.
1. Use Slides from Files on the Insert menu.
2. Locate a TMP file.
3. Open the presentation in Microsoft Office Word.
4. Move the file to a different place.
5. Open the file in a different way.
6. Use Safe Mode.
7. Use Damaged Presentations Troubleshooters.
8. Try a third-party recovery tool.

Use Slides from Files on the Insert menu
Sometimes you can recover some or all of a corrupt presentation by clicking Slides from Files on the Insert menu. Use the following steps:
1. Open a new blank presentation.
2. On the Insert menu, click Slides from Files.
3. In the Slide Finder dialog box, browse to your corrupt file.
4. Click Insert All.

If clicking Insert All doesn’t work, try clicking Insert to insert individual slides.
Note: If your corrupt slides do insert, they will take on the blank presentation formatting. You can apply the original design template to correct this. You can experiment by selecting the Keep source formatting check box in the Slide Finder dialog box if you want. The real goal, though, is to get your information back. You can reformat it if necessary.

Locate a TMP file
Occasionally when you lose your file, there will be a TMP file available. This usually only happens when you lose the file while saving, or if you were working on it when PowerPoint or Windows crashed. Nevertheless, it’s worth checking.

1. Right-click the Windows Start button, and then click Search.
2. In the All or part of the file name box, type *.TMP.
3. In the Look in list, click either Local Hard Drives, or even My Computer.
4. Click Search.
5. After Windows finds your TMP files, click the Date Modified button at the top of the Search Results pane. You might have to scroll to the right to see this button.
6. Look for a TMP file created around the time that you lost your PowerPoint file. Note the folder it’s in.
7. Open PowerPoint, and then click Open on the File menu.
8. Click the arrow next to the Files of Type box at the bottom of that dialog box, and then click All Files.
9. Navigate to the folder where the TMP file is located.
10. Click the TMP file, and then click Open

Open the presentation in Word
You may be able to recover at least part of your text this way.
1. Open Word.
2. On the File menu, click Open.
3. In the Open dialog box, click the arrow next to the Files of Type box at the bottom of that dialog box, and then click Recover Text From Any File.
4. Navigate to your corrupt file, select it, and then click Open.

Don’t forget to reset your Files of Type option in the Open dialog box back to All Word Documents after you finish, or you may see strange things happen when you subsequently open Word documents. If you are able to recover your text in Word, you can move the text back into PowerPoint by clicking File, pointing to Send To, and then clicking Microsoft Office PowerPoint.

Spend some time with the styles in Word so that the text ends up where you want it in PowerPoint. All text formatted Heading 1 will become slide Title text in PowerPoint. Heading 2 style will become primary bulleted text. Heading 3 will become secondary bulleted text.

Move the file to a different place
If you’re trying to open the file from removable media (a floppy disk, a Zip or Jaz drive, a USB drive, a CD-ROM, a network server, or a shared drive), try copying the presentation to your hard drive, and then try to open it.
Try copying the file to a different computer’s hard drive, and then try to open it there.
Try copying the file to a different drive on your computer (for instance, if it’s on the C drive, copy it to the G drive), and then open it from there.

Open the file in a different way
There are a few things to try here. I personally haven’t had much luck recovering a truly corrupt file by opening it in a different manner, but it doesn’t hurt to try.
1. Click Open on the File menu in PowerPoint.
2. Double-click the PowerPoint file in Windows Explorer.
3. Drag the corrupt file to the PowerPoint program file (POWERPNT.exe).
4. Open the file by using one of the PowerPoint Viewers. (Of course, this won’t help much if you need to do more than view the presentation. You should be able to at least print it from the Viewer, though.)

Use Safe Mode
Try opening PowerPoint in Safe Mode and see if that enables you to open the file.
1. In Windows, click Start, click Run, and then type C:\Program Files\Microsoft Office\Office10\Powerpnt.exe" /safe in the Open box.
2. Insert the appropriate path for your version of PowerPoint.

Try opening Windows in Safe Mode.
1. Click Start, click either Turn Off Computer or Shut Down, and then choose Restart.
2. When your computer restarts, press and hold down the appropriate “F” function key to restart in Safe Mode. F8 is often the key to use.
3. Open PowerPoint, and then try to open your presentation.

These techniques are the least likely to work, but they’re worth trying. Usually if a presentation opens when in PowerPoint or Windows Safe Mode, it’s because of a conflict with a driver or an add-in. You may also want to run a ScanDisk and use the Error-checking options on its Tools menu.

Try a third-party recovery tool
Because other products do not include all of PowerPoint’s functionality, or might not support elements of that functionality in their import utilities, you can sometimes use them to open files that PowerPoint identifies as corrupt.

Although you probably won't recover everything in your presentation, if you don’t have any luck using any of the previous methods, you might want to consider a third-party recovery tool.

For a detailed discussion of third-party recovery tools, see the full text of this article on EchosVoice.

Conclusion
Recovering a corrupt PowerPoint file is iffy at best. If you have a backup of your file, dig it out and get back to work. But before you do that, check the information on how to prevent corruption in the first place so that you don’t just end up with another corrupt file.

By Echo Swinford, Microsoft MVP and creator of EchosVoice.

Tuesday, June 16, 2009

How to Advance Slides Automatically in PowerPoint

Are you lazy like me and feel that clicking your mouse to change slides in PowerPoint 2007 is not a good use of your time? Maybe not!

But maybe you just want a series of slides to advance automatically while you talk to your PowerPoint deck. Well with PowerPoint 2007 it is easy.

1) Select the slides you want to have automatically advance
2) In the Ribbon, make sure you are on the “Animations” tab
3) Look to the far right hand side, and make sure you check “Automatically After”
4) Beside that checkbox, enter the number of seconds you want to the slide wait before it automatically transitions to the next.


Simple as that! While you are there, you can also change the transition – whether you want a fade, dissolve, wipe, push and cover, or stripes and bars – just choose your favorite from the transition gallery!

How to Insert a SWF file to PowerPoint 2007

Have you or a creative genius close to you created an unreal shockwave/flash animation and you want to show the world?

Did you know that you can show off that animation using PowerPoint 2007? Bet you didn’t. That being said it isn’t the simplest of things you can do – but it does work. Here is the step by step guide to doing it!
1) Open PowerPoint 2007
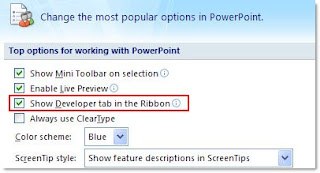
2) Make sure you can see the “Developer” tab in the “Ribbon”. If you can’t, click on the Office menu (the circle button in the top left hand corner), then click on “PowerPoint Options”, and make sure that you check the “Show Developer tab in the Ribbon” box!


3) Go to the slide you want the .swf file to appear
4) Click on the “Developer” tab in the Ribbon
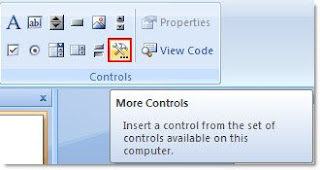
5) Look for the “More Controls” button in the controls group. It is the one with a spanner and a hammer with three dots underneath it. Once you find it – click on it


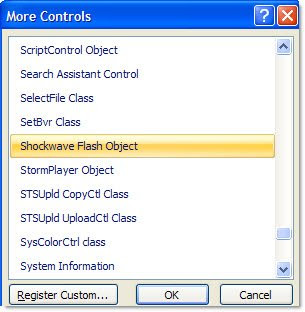
6) The “More Controls” box will appear. Scroll down until you find “Shockwave Flash Object”. Click on that, then click “OK”


7) You will notice your cursor is now a cross, and no longer an arrow. That means you can now draw where you want your Shockwave/Flash file to appear on your slide. Simply draw with your mouse, and use the adjustment handles on the box to make sure it is just the right size and position on your slide. When you are done you should see a wireframe box with a big “X” through the middle of it.
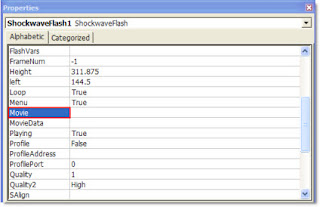
8)Now we want to link your .swf file into your PowerPoint 2007 presentation. Click on the box you just drew, then right click, and select “Properties”
9) In the properties box that appears, look for the “Movie” property, and then add the location of your .swf file (for example c:\temp\test.swf)


10) Quickly run your presentation and watch in awe as your shockwave file hits the big screen in your PowerPoint 2007 presentation

So how did you go? Sure it is a little complicated to get there, but boy does it look good once you have that file playing through PowerPoint.

Just a word of warning though – this only LINKS to the .swf file, so if you email or share the presentation with others, chances are the link will break and you will need to go through the above process again to re-link the PowerPoint deck to the .swf

Thursday, June 11, 2009

How to Set Background Picture for a PowerPoint File

For designing an attractive PowerPoint, you may want to set background picture for your slideshow. Here is the way.

For PowerPoint 2003:
1. Open/Create a PowerPoint file
2. Choose one slide, Right Click on it, and then click Background

3. Click on Pull-Down Menu, choose the Fill Effects

4. Choose the Picture tab at the top of the Fill Effects dialog box. Click on the Select Picture button to locate the photo saved on your computer.

5. Click OK to add the picture to the slide background.
6. Click Apply to All or Apply button

For PowerPoint 2007:
1. Click on the slide that you want to add a background to.
2. On the Design tab, in the Background group, click Background Styles, and then click Format Background.


3. Click Fill, and then click Picture or Texture fill.

4. Do one of the following
1) To insert a picture from a file, click File, and then locate and double-click the picture that you want to insert
2) To paste a picture that you copied, click Clipboard.
3) To use clip art as a background picture, click Clip Art, and then in the Search text box, type a word or phrase that describes the clip that you want, or type all or part of the file name of the clip. To include clip art that is available on Microsoft Office Online in your search, select the Include content from office Online check box, click Go, and then click the clip to insert it.

5. To use the picture as a background for the slides that you select, click Close. To use the picture as a background for all of the slides in your presentation, click Apply to All.

How to Play a Sound across Multiple Slides in PowerPoint

Want the sound inserted into your PowerPoint play across multiple slides? Here is the way.

For PowerPoint 2003
1. Go to the slide where you want to begin your audio track (defaulted as the first slide), and select Insert -> Movies and Sounds -> Sound from File to insert the sound.

2. After you click OK, you can see a message pop up asking how you want the sound to start in slide shows. Click Automatically.

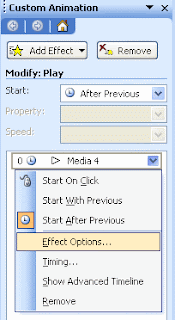
3. Select Slide Show -> Custom Animation to enter the Custom Animation pane. Your soundtrack is listed below in the pane.

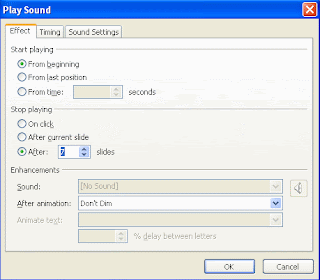
4. In the drop-down list of the sound, choose Effect Options. Then the Play Sound interface appears. In the Effect tab, click the radio button beside Stop Playing After XXX slides (which indicates how many slides you want this song to play across) to enter the number of slides you intend to add. For example, you can enter a number from 1 to 999 for this field. Then the sound will play throughout the specified slides.


5. Next, check the settings in the Timing tab. To play automatically, you can set to Start After Previous with a 0-second delay. Click OK to exit the dialog box.
6. Then go to Sound Settings tab, adjust the sound volume as you like. You can also tick to hide sound icon during slideshow if you don’t want it appear.

For PowerPoint 2007:
It is much easier to make a continuous sound in PowerPoint 2007, as it is more comprehensive. Just follow these steps:
1. On the slide, click Insert to pick the Sound drop-down list on the very right below the tab. Select Sound from File in the list and choose the specified sound track from your hard drive.

2. Click OK and a message prompts, hint How do you want the sound to start in the slide show. Click Automatically.

3. Now click the sound icon to display the Options tab. Click on the tab, and set Play across slides for Play Sound.


With the steps above, it is time for you to enjoy the pleasant sound.

Tuesday, May 19, 2009

Movies or Video Clips in PowerPoint

Insert the Movie into PowerPoint

Insert the Movie or Video Clip
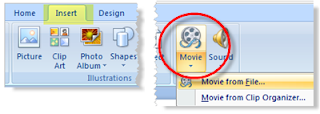
• PowerPoint 2007
1. Click in the Insert tab of the ribbon.
2. Click the drop down arrow on the Movie button on the right side of the ribbon.
3. Choose to insert a Movie from File... or Movie from Clip Organizer...
• PowerPoint 2003
1. Choose Insert > Movies and Sounds > Movie from File... or Movie from Clip Organizer

Note - Movies from the Clip Organizer are not really movies per se, but are actually animated GIFs

Choose a Movie File Type for Use in PowerPoint
Not All Movie File Types are Equal
Movie file types, which are indicated by the file extension, are many. Not all movie file types are compatible with PowerPoint. The most commonly used compatible movie file types for PowerPoint are -
• WMV
• AVI
• MPG
• ASF

A further consideration is the file size of the movie file to be inserted into your presentation. A large movie file size may not even play on your computer. Generally, an AVI file is much larger than the MPG or WMV file types. You may need to consider using other software to first compress your movie file into a smaller size before inserting it into PowerPoint. However, be aware, that with video compression comes some loss of quality.

Choose Your Movie File Type
1. At the bottom of the Insert Movie dialog box, click the drop down arrow beside Files of type:
2. Choose the correct file type from the list.
3. Locate the movie file on your computer.
4. Click OK.

Choose a Method to Start the Movie in PowerPoint

Start Movie Automatically or On Click
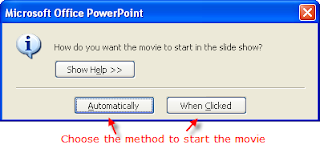
You will be prompted for the method to start this movie during the slide show.
• Automatically - The movie will start immediately following the previous motion. A motion can be a transition, an animation or simply the showing of the previous slide.
• When Clicked - The movie will not start until the mouse is clicked. The movie will follow the previous motion.

Test the Movie
1. Press Shift + F5, a shortcut key combination that will show this slide in full screen.
2. Press the Esc key to stop the slide show.

From http://presentationsoft.about.com
By Wendy Russell

Further reading:

PowerPoint to movie - Top 3 Methods about PowerPoint to Movie Conversion
PowerPoint to FLV - How to convert PowerPoint to FLV

Wednesday, May 13, 2009

How to Hyperlink to another Presentation - Hyperlinks in PowerPoint

Question: How Do I Use a Hyperlink to Open Another Presentation Seamlessly?

The scenario
Two presenters are on the agenda. They both have PowerPoint presentations to accompany them. The first presenter finishes and then the second presenter fumbles around trying to find his presentation on the computer before he can start. The audience starts to fidget and talk among themselves and the momentum is lost.
How can you keep the flow going from one presenter to the next, without losing the audience's attention?


Answer: The simplest answer is to create a slide at the end of the first presentation that contains an invisible hyperlink to open the second presentation. When the second presenter steps up front and center, all he has do is click the mouse and his PowerPoint presentation will open.

A tiny bit of preparation is necessary before the big moment. A single slide needs to be added to the end of the first presentation. Generally, I like this to be a black slide, but rather than use PowerPoint's feature to add a black slide at the end of the presentation, you will add a new slide and cover it entirely with a black rectangle. This graphic object will be the source of the hyperlink to the second presentation.

Secondly, it is always in your best interest to have all the files for any presentation located in the same folder. So, create a new folder and copy all presentations and any linked components into that folder before you continue.

PowerPoint 2007
1. Add a new slide to the end of the first presentation.
2. From the Home tab of the ribbon click on the rectangle tool in the Drawing section of the ribbon.
3. Draw a rectangle large enough to cover the whole slide.
4. Right click on the rectangle and choose Format Shape...
5. In the Format Shape dialog box, select Fill > Solid Fill. Choose black from the Color drop down selections and then close the Format Shape dialog box.
6. Right click on the rectangle again and choose Hyperlink....
7. In the Link to: section on the left side of the dialog box, choose Existing File or Web Page.
8. Locate the second PowerPoint presentation file previously saved on this computer.
9. Click OK

Now when you run the first slide show, the new presenter simply clicks on the last slide (the black slide) when he is ready to go, and his presentation will open in slide show view, on the first slide.

PowerPoint 2003 and earlier
1. Add a new slide to the end of the first presentation.
2. Using the Drawing toolbar at the bottom of the PowerPoint window, click on the rectangle tool.
3. Draw a rectangle large enough to cover the whole slide.
4. Right click on the rectangle and choose Format AutoShape... and change the fill color to black.
5. Right click on the rectangle again and choose Hyperlink....
6. In the Link to: section on the left side of the dialog box, choose Existing File or Web Page.
7. Locate the second PowerPoint presentation file previously saved on this computer.
8. Click OK

Now when you run the first slide show, the new presenter simply clicks on the last slide (the black slide) when he is ready to go, and his presentation will open in slide show view, on the first slide.

From http://presentationsoft.about.com
By Wendy Russell

Monday, May 11, 2009

How Do I Rehearse and Record Timings in PowerPoint?

Question: How Do I Rehearse and Record Timings in PowerPoint?
Many readers wonder how to know what timings to set for their slides. The easiest way to set the slide timings is to rehearse and time your PowerPoint presentation by progressing through the slides as if you were seeing them for the first time. As you click the mouse to advance the slides, PowerPoint can record the timings on the slides for you.


Answer: When setting automatic timings for your presentation, it is often difficult to decide how long your slides should stay on screen.

Things to consider:
Is this a photo album where each slide will stay on screen for the same length of time?
Is your presentation meant to accompany your talk on the subject, where each slide will be on screen for a different length of time?
Are there time constraints on your presentation?
All these things need to be considered when setting timings for your presentation.
The easiest way to know exactly how long your presentation will take is to Rehearse Timings. This feature is found in the Slide Show menu.

Method
1. Make sure the first slide in the presentation is selected.
2. Choose Slide Show > Rehearse Timings from the menu. The Rehearsal toolbar will appear and the timer will start.
3. Each time you click the mouse (or the Next button on the Rehearsal toolbar) the next item will begin.
4. Once you have completed the rehearsal, PowerPoint will prompt you to save these timings.
• Choosing Yes will assign the timings for each slide. Every slide may have a different timing assigned, depending on how long you left the slide on screen, during the rehearsal.
• Choosing No will cancel these timings and allow you to go through the process again until you are happy with the results.

For Example
• Start the Rehearsal timings. Once you have decided that the Title slide has appeared long enough on screen, click the mouse.
• The transition to the next slide will start and the next item will appear -- probably the title of the next slide.
• Click the mouse again and the next item will appear -- perhaps a graphic or bullet point. Whatever animations you have applied to the slide will start on the mouse click.

Note - It is a good idea to rehearse your oral presentation out loud while you rehearse the timings. This way you will know exactly when to pause for effect and when to advance to the next slide. You can pause the rehearsal at any time, to gather your thoughts, by clicking on the Pause button on the Rehearsal toolbar. You can also assign a timing manually to a specific slide, by typing the time into the text box on the Rehearsal toolbar.

From http://presentationsoft.about.com
By Wendy Russell

Tuesday, May 5, 2009

How to Play YouTube Videos Directly in a PowerPoint

Many times see people ask how to insert YouTube videos in PowerPoint. Many good solutions are found, such as the method mentioned in this article: http://www.ppt-to-video.com/knowledges/embed-youtube-powerpoint.html#105
But how can you directly play a YouTube video in PowerPoint? Here is the way.

1. Open Microsoft PowerPoint 2007

2. Go to Developer (to enable this, go to Office button-> PowerPoint options-> Show Developer tab in the Ribbon), and then click More Controls


3. Scroll down until you find “Shockwave Flash Object”; select it. Then on your slide, click and drag to make a box. The box should have a black X in the middle.


4. Open up your favorite internet browser and go to the video you want to put in your presentation.

5. Copy the URL which will look something like: http://www.youtube.com/watch?v=fGPjB4qzUy8

6. Take the “watch?v=FGPjB4qzUy8″ and simply change it to “watch/v/FGPjB4qzUy8″. (All I did was change the ? and = to a /. The final URL should look like: http://www.youtube.com/watch/v/FGPjB4qzUy8

7. Copy the new URL and go back to your PowerPoint. Right click on the box you made earlier and select properties.

8. Then find “movie” and click on the box across from that. Paste the new URL into that spot. Click the X to close that window.

10. Finally, play your Powerpoint and the Youtube video will appear like magic!

Further reading:
PowerPoint to movie - Top 3 Methods about PowerPoint to Movie Conversion
PowerPoint on Windows Media Player - View PowerPoint on Windows Media Player

Monday, May 4, 2009

Lock PowerPoint File From Being Edited

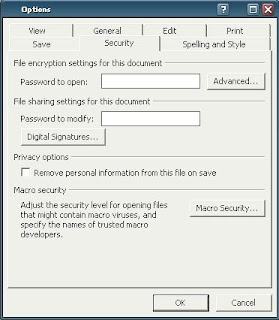
You might have to distribute copies of your PowerPoint presentations to other people. It is important that you lock or protect that PowerPoint file so others can view it, but not make changes to it. There are numerous software that will promise to add password protection to your file but you will have to pay money for those software. As a matter of fact, Microsoft PowerPoint already has a built-in feature that will allow you to lock the Power Point file.

1. Open up your PowerPoint Presentation
2. Go to Tools
3. Options
4. Security
5. Enter a password for “Password to modify.”


You can also type in a password to restrict viewing of the PowerPoint file. Just type a password in “Password to open” and click OK.
That’s how it works in Microsoft PowerPoint 2003, and I assume it’s similar in older versions of Power Point.

Another method is saving and distributing the presentation as a Powerpoint Show (.PPS) instead of PowerPoint Presentation (.PPT). The presentation cannot be edited anymore when in (.PPS). To do this:

1. Click File
2. Save As…
3. Select (.PPS) under “Save as type.”

Have you considered converting the (.PPT) PowerPoint file format to an Acrobat PDF format? But you’d be better off just password protecting the file, that way they could still watch the slide show. But if you want make a PDF, carry on. Granted, not everyone has the full version of Adobe Acrobat Pro (which costs well $). But there are freeware tools, such as Pdf995. Pdf995 can convert various files to PDF. PDFs are much harder to modify than a Microsoft-password-protected PPT file.

From http://roobaroo.net

Wednesday, April 22, 2009

6 tips to reduce the size of your PowerPoint file

Is a PowerPoint file that is over 10 MG too large? Yes! PowerPoint files shouldn’t be too large to send in an email or load into a Google Group.
The following 6 tips will help you reduce the size of your PowerPoint.
1. File > Save As
2. Compress Pictures
3. Break Links
4. Turn off Fast Saves
5. Turn off the Activated Review Feature
6. Sneaky trick … use save as a CD to compress

1. How to Use File > Save As:
Step 1 - On the File menu, click Save As
Step 2 - Type a new name, and click OK
** In some cases, this can reduce the size of the file by up to 50%

2. How to Compress Pictures in PowerPoint:
If you have any pictures in your PowerPoint presentation, then you can optimize the size by compressing pictures.
Step 1 - Click on the picture to bring up the Picture toolbar
Step 2- Click the compress picture button


Step 3 - On the Compress Pictures menu:
• Apply to: All pictures in document
• Change resolution: Web/Screen
• Options: Compress pictures and Delete cropped areas of pictures
• Click OK

When the command finishes, you can save the file at a fraction of it’s prior size. In this case we had 100+ maps in a 70 Meg file. After the Compress Picture command finished, the file was only 12 Meg.

3. How to Break Links in PowerPoint:
For our operational finance decks, we link to Excel. Before emailing your final PowerPoint file, I suggest breaking all links. More links = bigger file size.
Step 1: Type [ALT+ E], then [ALT+K] to view the Links menu or on the Edit menu, click Links
Step 2: Select all links. Click on the first link, hold the shift key and click on the last link. All Links will be highlighted in blue.


Step 3: Select Break Link, and all links will be removed from the PowerPoint

4. Turn off Fast Saves
Step 1: On the Tools menu, click Options, click the Save tab, and then clear the Allow fast saves check box. (This removes excess data from your presentation file each time you save)
Step 2: On the File menu, click Save As, type a name for the new version of your presentation in the File namebox, and then click OK.

5. How to turn off the Activated Review Feature in PowerPoint:
This only works on PowerPoint 2007
Step 1: On the Tools menu, click Options, click the Advanced E-mail tab
Step 2: Clear the check box next to “add properties to attachments to enable reply with changes”

6. How to use save as a CD to compress your PowerPoint file:
When all else fails, this trick always has a big impact on reducing the size of a PowerPoint file.
Step 1: On the Files menu, click Package for CD

Step 2: Select a folder where the new file will be saved


From http://businesstoolsblog.com

Sunday, April 19, 2009

How to Group Objects in PowerPoint

Blocks, arrows, pictures and other objects inside a page of a PowerPoint slide are hard to maintain if not grouped. It is hard to move each object especially if their relative position needs to be maintained.
For example, you have two blocks and an arrow on a PowerPoint page, selecting the 3 objects will highlight them individually:


Ungrouped objects are easy to break during editing. If I failed to select all 3 objects, the selected objects might get separated. In the example below I selected only the second box so when I moved it it got separated from the other objects:


If my intention was to move the whole thing, grouping the objects together is the right approach. Compare the two flow charts below where in we have the ungrouped objects on the left while the grouped objects on the right:


You can see that the grouped object is highlighted as a single object while the ungrouped objects are individually selected. Grouped objects are taken as one so moving a group does not separate the individual objects inside it.
To group a set of objects, choose the objects and then right click to open the Group menu. Click Grouping then Group:


Once objects are grouped, they will move as one. You will still be able to edit the test inside a grouped text box:


To un-group, just right click the group then click Group > Ungroup:


Grouping objects is an essential PowerPoint skill especially if you handle a lot of flowcharts or drawn objects.

From http://www.online-tech-tips.com

Thursday, April 16, 2009

Instant PowerPoint Presentations Using The PhotoAlbum Feature

PowerPoint presentations are a great way of communicating and influencing your clients, work colleagues or audience. One of the most important components within presentations are images. This article will show you how to take a group of images and turn them, as if by magic, into a PowerPoint presentation.

You can use the techniques described in this article whenever you have a group of images whose content are at the core of the presentation you need to create. One example might be giving a presentation to introduce a new range of products based around a series of product photos.

To get started you need to bring up the New Presentation task pane. To do this, choose File - New. Next, click on “Photo Album” in the New Presentation task pane window.

When the Photo Album window appears, you begin identifying the images you want included in the presentation. You can click on the button marked File/Disk to browse for the images or you can import them straight from your digital camera or scanner.

The Photo Album window is very versatile. Once, you have imported your pictures, it allows you to reorder them by selecting and image and clicking on the up and down arrows. If you change your mind and decide to delete an image, no problem. Just click on the name of the image then click the Remove button.

Next, you can check the tonal quality of each image. You can increase or decrease the brightness or contrast as necessary by just clicking on one of the four image control icons. In addition, you can rotate images clockwise or anti-clockwise by clicking on one of the two image transformation icons.

However important a part your images will play in the presentation, every presentation will need some text. The Picture Layout drop-down menu lets you specify whether you want one, two or four images with a title. (You can omit the title, though it is unlikely you will wan to do so.) You can also place the title above or below the image.

There is also an option to change what is referred to as the Frame Shape. The default is rectangle. However, the Frame Shape drop-down menu will also let you choose rounded rectangle, bevelled, oval, corner tabs, square tabs or plaque tabs.

That’s it; you’ve finished. When you click OK, PowerPoint will create the presentation generating a separate slide for each image, using the settings that you specified in the Photo Album dialogue. The final touch is to go to each slide and type some text into the title box. Once you’ve done that, you have yourself a PowerPoint presentation. How painless is that!

From http://www.theworldofoffice.com
by Andrew Whiteman

Related article:
How to Create a Digital Photo Album with PowerPoint


Tuesday, April 14, 2009

How To Embed Mp3 Audio Files In Microsoft PowerPoint Presentation

If you use Microsoft Office PowerPoint to make presentations you will know that you can only embed wav audio files. The problem is that wav format is almost 10 times bigger in size when compared with mp3 format. The only working technique is that we can add a header to the mp3 file that will convince the PowerPoint that it is actually a wav audio file. This method will add the wav extension at the end of the file name but the format will remain as mp3, this is known as masking.

In my earlier post I reviewed a software called CDex, you can use it to add wav header to the mp3 file. First convert wav audio to mp3 format by clicking Convert Wav file(s) to mp3 format(s) button or selecting it from the Convert menu as shown in the screenshot below.


Now select the directory where the wav file resides, select the file from the list and click Convert.


The converted mp3 file will be located in your My Music folder inside the Documents folder(you can however change the output destination by going to Options).
If you already have an mp3 file then you can skip the above steps. Just select Add RIFF-WAV(s) header to MP2 or MP3 file(s) from the Convert menu and in the new window select the mp3 file to which you want to add the header.


In my case, test.mp3 was given a wav header and it became test.wav, the size of both files were same. The test.wav is just a file to confuse PowerPoint, actually it is in mp3 format with .wav extension at the end of the file name.
Now open Microsoft Office PowerPoint, go to Insert tab, click Add Sound From File, and select the audio file.


Now once the sound has been added, you will be automatically taken to Sound Tools tab. Here under Sound Options, increase the maximum size of audio file that can be embedded to 50000KB.


Since the changes made in the options are not retroactive, you will have to delete the audio file and re-add it again. Now when you re-add it, the audio file will be embedded inside the presentation instead of simply getting linked.

Embedded audio and Linked audio are different in every aspect, embedded audio is stored inside the presentation while linked audio is stored outside the presentation. Embedded audio can come useful in cases where you have to email a presentation to someone. To verify whether your audio file has indeed been embedded in the presentation, click the Dialog Box Launcher under Sound Options.


Now under Information, next to File, you will see [Contained in presentation], this means the audio file has been successfully embedded.


Note: This technique has been tested multiple times and is 100% confirmed to be working, if it doesn’t work for you, this means that you did not follow the steps properly.
Enjoy!

From http://www.addictivetips.com/
By Nakodari